> What’s New ? <
Gdb for C On A Stm32f051 Disco
By Terry Porter (2023). Open Source, See COPYING for license details.
Note
This Readme is the latest version. The release PDF may become out of date.
Download Release: https://sourceforge.net/projects/mecrisp-stellaris-folkdoc/files/GDB-C-F051-blinky-11.01.23-Fc481.zip/download
Abstract
Demonstrates a automated GDB debugger running code live on a STM32F0 Discovery Board.
With a STM32F0 Discovery board connected to a Unix PC, running ‘run-gdbtui.sh’ opens up a GDB-TUI window that shows the C source code. Hitting the ‘s’ key single steps thru the code lighting the board LED and vice versa.
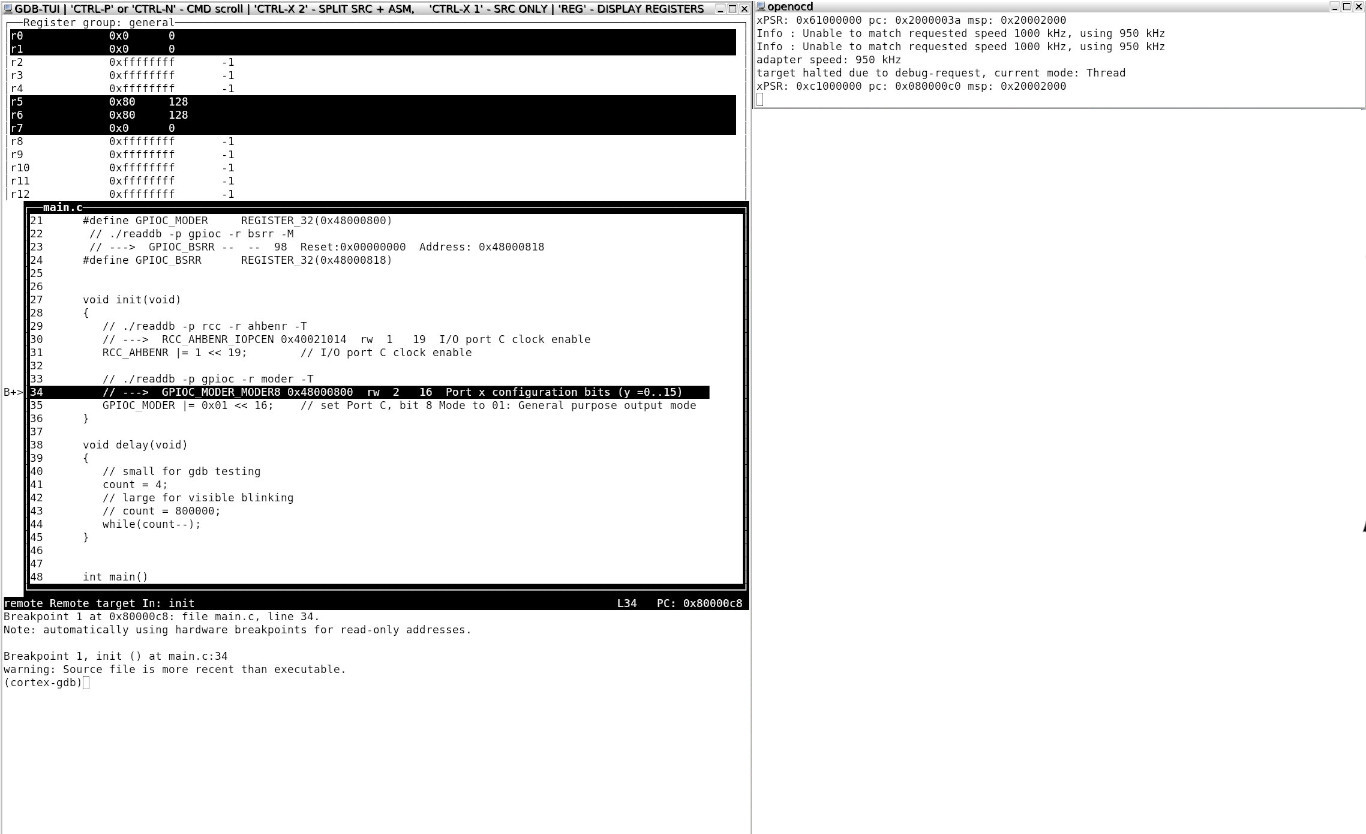
Picture: from Operation, step 5. below. Note: the C code was written using SVD2DB-V1 for register addresses, bitfield offsets and bitwidth data. This replaces the need to find a library/headers etc.
The comments in the code are to show how SVD2DB-V1 is used.
Dependencies
Openocd, GDB, st-flash (from st-link), arm-none-eabi. Unix use is assumed.
Critical
For run-gdbtui.sh to work:
.gdbinit
MUST be in your home directory with the contents below.
set auto-load local-gdbinit on
show auto-load local-gdbinit
info auto-load local-gdbinit
Operation
unzip GDB-C-F051-blinky-11.01.23-xxxxx.zip into a directory
chmod +x run-gdbtui.sh readdbview readelf
Connect a STM32F0 Discovery board to your PC via the USB cable. Your system should see the board as a ‘<STMicroelectronics STM32 STLink>’
Execute run-gdbtui.sh in a xterm and a GDB and a OpenOCD window should open.
Hit return in the GDB-TUI window and the blinky source should load.
Hit ‘s’ to single step thru the source. When the LED is turned on in the source, the LED on the F0 Disco board should light etc.
If you edit the main.c sourcefile, just enter ‘make’ to rebuild the image. Kill the GDB-TUI and Openocd windows and run step 4 again. These steps can be added into the Makefile if you wish to automate it.
GDB Tips
Set a value
(gdb) set *((unsigned int *) 0x1FFF0E80) = <value>
Extras
readdbview for the STM32F051 is supplied: This allows the easy search and retrieval of all peripheral register data such as absolute memory addresses and bitfields etc. See the link below for how to use it or run ./readdbview and read the inbuilt help. https://mecrisp-stellaris-folkdoc.sourceforge.io/svd2db-v1.htm
A C user explains why they don’t want to learn the details of Gcc etc
Here’s how I see it, as someone who is still a novice at programming: I have only so much mental energy and time available at a given moment. If my goal is to learn microcontroller programming, then any effort expended on the toolchain is mental energy and time taken away from the actual programming. And it’s not some kind of linear relationship: learning how to set up any part of the toolchain requires learning and understanding significantly more than is needed at the moment. (For example, while typing in the configurations for a given MCU doesn’t take too long, knowing what the options are and why you’d choose one or the other requires understanding the MCU in question, and that in turn requires understanding a lot of the inner workings of MCUs and digital logic.) So while it very well may make sense to learn all those things in the long run, it’s an insurmountable hurdle for a beginner. In the meantime, I can’t learn programming if I can’t even get the toolchain working. I can’t learn programming if the programming environment is throwing an error that is literally meaningless to me, before it’s even gotten to the point of trying to compile code.
So what happens? Your teacher or mentor configures it for you and leaves you to do the coding.
This is precisely why Arduino has become so extraordinarily successful: it provides a simple way to dip your toes. If MCU programming appeals to you, then you quickly outgrow it and progressively move closer and closer to bare metal. For many, this is where PlatformIO comes in: it’s a big step away from the Fisher-Price environment of the Arduino IDE, giving you a lot more flexibility, tools, and rope to bang yourself from, while still not quite requiring you to delve into the nitty-gritty like the first-party IDEs do (let alone very “manual” toolchains like compiling gcc or whatever).
I think a lot of the people who think configuring this stuff from scratch is easy, and that it’s how everyone should start, have a) completely forgotten what it was like when they started out, and b) may not recognize that not everyone is as interested or talented in it as they are.